
***I am a Pampered Chef Consultant – please contact me by clicking any of the buttons above when you would like to schedule your virtual or in-person party, fundraiser or wedding shower, or to place an order. If you have any questions about the products you already have, or want some information on starting your own PC business, I can help you with that as well!!***
Recipes may have been adapted, either using a different cooking method and/or pantry seasonings from the Pampered Chef. Appropriate credit has been given to the recipe blogger I have found it from, along with links back to the original source. Let’s get cooking!
Subscribe below to get emails whenever I share new recipes and tutorials!
Savor stress-free dinners with our Pampered Chef salsa chicken in the Deluxe Multi Cooker! Busy families rejoice – it’s easy, tasty, and ready in a snap! 🌟
This is one of our favorite dinners for a busy weeknight. You can enjoy it as is, in a lettuce cup or salad, in quesadillas, or make your own nacho dinner! It can be easily doubled, and it also freezes beautifully.
For this recipe, I used the Chili Lime Rub,Salad Chopper, and our Deluxe Multi Cooker:

A Kick of Flavor
This fan favorite has been brought back. It’s a classic combination of chili peppers and tangy lime and is perfect for shrimp, chicken, beef, pork, or fish. Keep some on your bar cart to rim margaritas!
Made in the USA
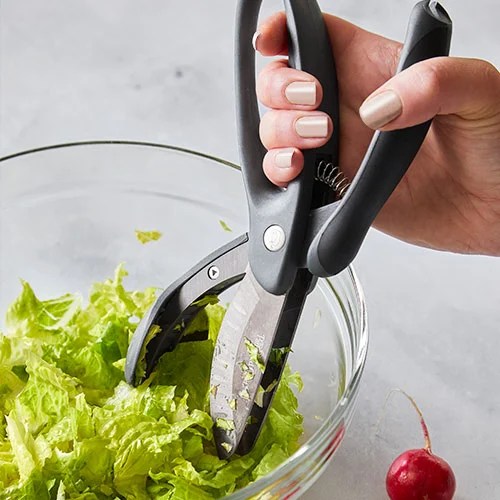
Our Salad Chopper makes it easy to chop salad, cooked meat, or veggies right in a bowl. The titanium-coated stainless-steel blades slice through food effortlessly, and the spring-loaded design keeps hands from tiring. Making shredded pork and chicken is a cinch, and chopping stewed tomatoes is mess-free.
Product Details
- 8¾”.
- Grooves along the blade edges help keep ingredients from sticking.
- Comfortable, soft-grip handles.
- Handle lock for safe and convenient storage.
How to Clean
- Dishwasher-safe.
Warranty
- Lifetime guarantee for noncommercial use.

Pressure Cooker, Sous Vide Cooker, Slow Cooker, Yogurt Maker, and Sterilizer
Our pressure cooker offers so many ways to get a delicious meal on the table with minimal effort and perfect results, every time. In addition to quick cooking—fast, flavorful meals cooked up to 70% faster than other methods even from frozen—and no-fuss slow cooking so it does it thing while you’re doing yours, you can sous vide, the secret to restaurant-quality steaks, fish, and more. With sous vide, you pick the temperature, and it cooks to the exact doneness you love, every time! No more undercooked centers and overcooked outsides. After your food reaches your perfect doneness, it can stay put for up to two hours without overcooking, giving you lots of wiggle room for serving. Plus, there is a yogurt function so you can make homemade yogurt with just two ingredients and less than 5 minutes of hands-on time, and you can even sterilize bottles and utensils. All of this without ever turning on the oven!
Confident Cooking
With 16 preprogrammed settings at your fingertips, you can cook everything from meat, rice, and beans to desserts minus the guesswork. Some added features include an indicator that shows at-a-glance progress of preheating, cooking, and warming so you always know the status of what you’re making and two lid rest slots on the back so you can securely rest the lid on the Deluxe Multi Cooker instead of your counter. The steam release button is safely positioned to keep your hands away from any steam and the outside of the unit stays cool even while in use.
Product Details
6-qt. (5.6-L) capacity; 13″ x 15″ x 13″ (33 cm x 38 cm x 33 cm)
Includes a stainless-steel inner pot, wire rack, and silicone seal which are all dishwasher-safe, and a cooking guide with recipes and cooking charts.
16 preprogrammed settings: Custom, Sear, Egg, Poultry, Beef/Pork, Seafood, White Rice, Whole Grains, Soup, Beans, Dessert, Steam, Slow Cook, Sous Vide, Yogurt, and Sterilize.
Built in carrying handles, hidden cord storage, and an on/off switch.
Separate display screen lets you adjust chime volume, brightness, Fahrenheit or Celsius, and adjust for high-altitude cooking if needed.
Click the links to get your Chili Lime Rub, Salad Chopper, and our Deluxe Multi Cooker today. You’ll be glad you did.
Let’s jump right in!!
Ingredients
- 2 lbs. boneless, skinless chicken breasts
- 2 tbsp Chili Lime Rub
- 1 cup salsa of your choice
Serving Station (optional):
- Lettuce cups
- Flour or corn tortillas
- Cheddar cheese
- Greek yogurt or sour cream
- Cilantro
- Avocado
- Tomatoes
- Shredded lettuce
Instructions
Season the chicken breasts with the Chili Lime Rub and place them in the Deluxe Multi Cooker, then add the salsa.


Lock the lid and select the POULTRY setting. Press START.

Meanwhile, Prep optional toppings as needed.
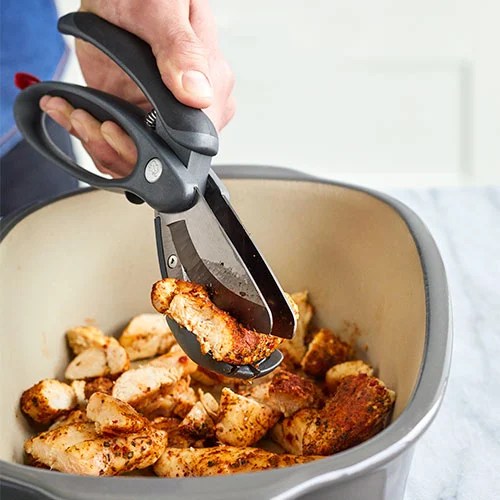
When the timer is up, press CANCEL. Press the steam-release button to manually release the pressure. Chop the chicken with the Salad Chopper. Serve the chicken with any toppings as desired.


That’s a wrap! I’d love to hear your thoughts, so please leave a comment below. Your feedback means a lot to me! Together, we’re making kitchen life easier, one Pampered Chef tool at a time.
Happy cooking!
— imapampchef
***I am a Pampered Chef Consultant – please contact me when you would like to schedule your virtual or in-person party, fundraiser or wedding shower, or to place an order. If you have any questions about the products you already have, or want some information on starting your own PC business, I can help you with that as well!!***
Here’s the scoop on all our March 2026 Host and Guest specials!!
APRIL – New Spring Finds – Shop our newest and coolest kitchen tools!
Made to Last. Meant to Love. Save on our best sellers!

For HOSTS – Get 60% off any product or set—including new products! See details.

Hosting a party is the perfect way to treat yourself to must-have kitchen tools, and find gift-worthy sets for upcoming celebrations! 👉 Ready to plan your in-home or virtual party? Click here to get started:
👇
🎁GUESTS GIFT WITH PURCHASE 🎁
- Spend $90 – Get a $15 account credit on your next order!*
- PLUS – FREE STANDARD SHIPPING with any $150 purchase. Offer ends April 30th. See details.
🎉 Don’t wait—these deals won’t last! 🎉

I’d love to hear from you! Please drop a comment below or send me a direct message to place an order or schedule your in-home, virtual, or catalog party with me. I’m excited to help you earn some fantastic FREE and discounted products!

Imapampchef
Subscribe below to get emails whenever I share new recipes!
Follow me on Facebook – Instagram – Tik Tok – Pinterest – YouTube

Quick and Easy Pressure Cooker Salsa Chicken (Video)


Ingredients
Ingredients
- 2 lbs. boneless skinless chicken breasts
- 2 tbsp Chili Lime Rub
- 1 cup salsa
Serving Station (optional):
- Lettuce cups
- Flour or corn tortillas
- Cheddar cheese
- Greek yogurt or sour cream
- Cilantro
- Avocado
- Tomatoes
- Shredded lettuce
Instructions
Instructions
- Season the chicken breasts with the Chili Lime Rub and place them in the Deluxe Multi Cooker, then add the salsa.2 lbs. boneless, 2 tbsp Chili Lime Rub, 1 cup salsa
- Lock the lid and select the POULTRY setting. Press START.
- Meanwhile, prep optional toppings as needed.
- When the timer is up, press CANCEL. Press the steam-release button to manually release the pressure. Chop the chicken with the Salad Chopper. Serve the chicken with any toppings as desired.Lettuce cups, Flour or corn tortillas, Cheddar cheese, Greek yogurt or sour cream, Cilantro, Avocado, Tomatoes, Shredded lettuce
Notes
Nutrition Estimate
Nutritional Information Disclaimer:
The provided nutritional information is automatically calculated and should only be used as an approximation. It is offered as a courtesy and may not reflect exact values due to variations in ingredients, cooking methods, and other factors. We recommend consulting with a qualified healthcare professional or nutritionist for precise dietary information.


